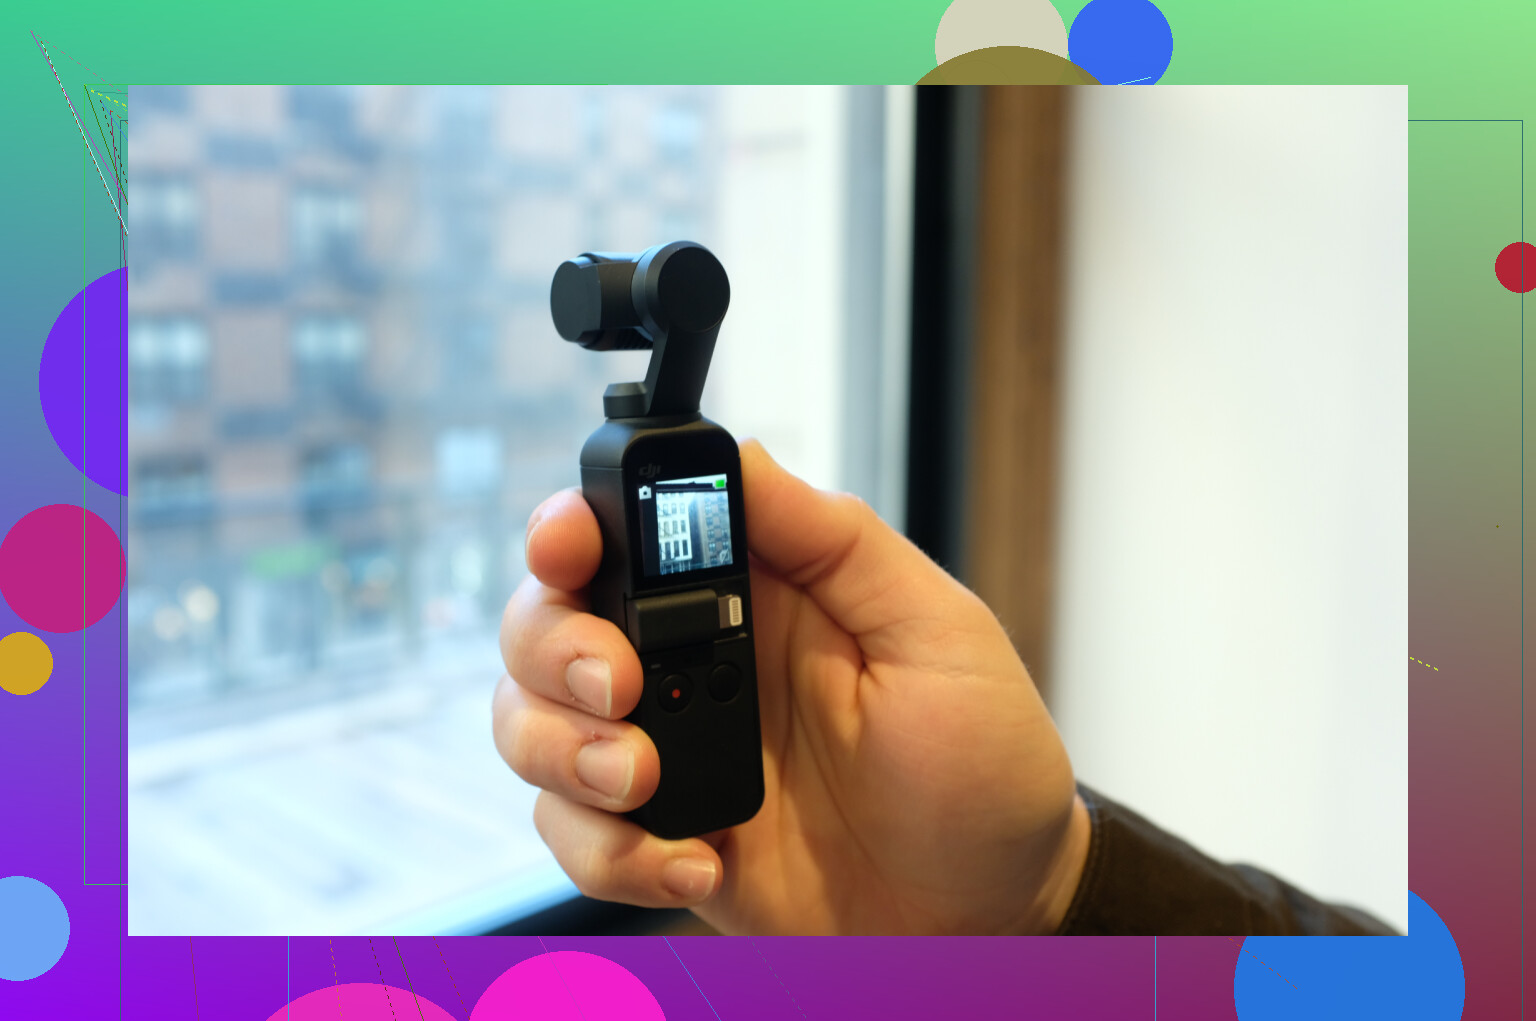
I just shot a bunch of 4K clips on my DJI Osmo Pocket 3 and I’m struggling to get the videos onto my Mac. The camera connects, but the files either don’t show up or transfers fail halfway through. I’m not sure if I should be using a card reader, DJI software, or some specific settings on the camera or macOS. Can someone walk me through the best and most reliable way to move these videos over for editing?
If you just got a DJI Osmo Pocket 3, there’s a good chance you ran into the same thing I did: recording great footage right away… and then spending way too long figuring out the best way to get it onto a Mac. I remember thinking it would be instant and obvious, but instead I ended up trying different cables and digging through folders before it finally clicked.
Here’s what actually works, based on what I’ve been doing.
The basic USB transfer method (the way I started)
At first I just used the direct cable method because that’s the obvious approach. You just connect the camera to your Mac with a USB-C cable (or USB-C to USB-A if you have an older Mac or a hub). Once connected, you turn on the Pocket 3 and it shows a USB connection option on the touchscreen. You tap File Transfer / USB OTG, and then macOS recognizes it like an external drive.
After that I would open Finder, see the camera appear in the sidebar, and go digging through the folders. The videos are usually inside DCIM → DJI, which isn’t hard once you know where to look, but the first time I had to poke around a bit.
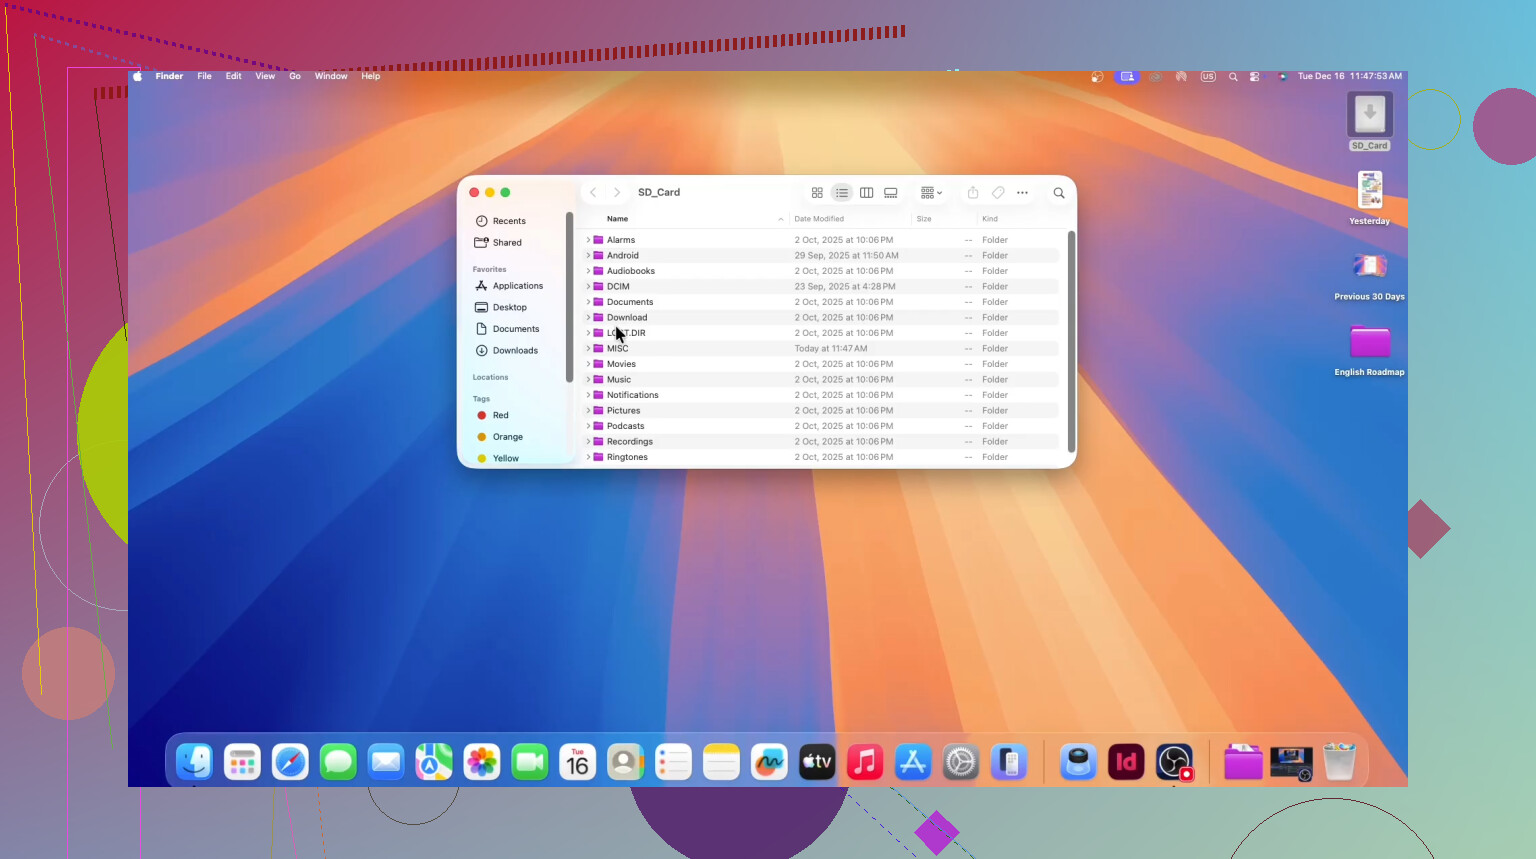
From there it’s just drag-and-drop into whatever folder you keep your footage in.
It works, no question. But honestly it always felt a bit mechanical and manual to me, especially if you’re transferring clips often. Lots of opening folders, copying, organizing manually… nothing terrible, just not very smooth.
What ended up being easier for me
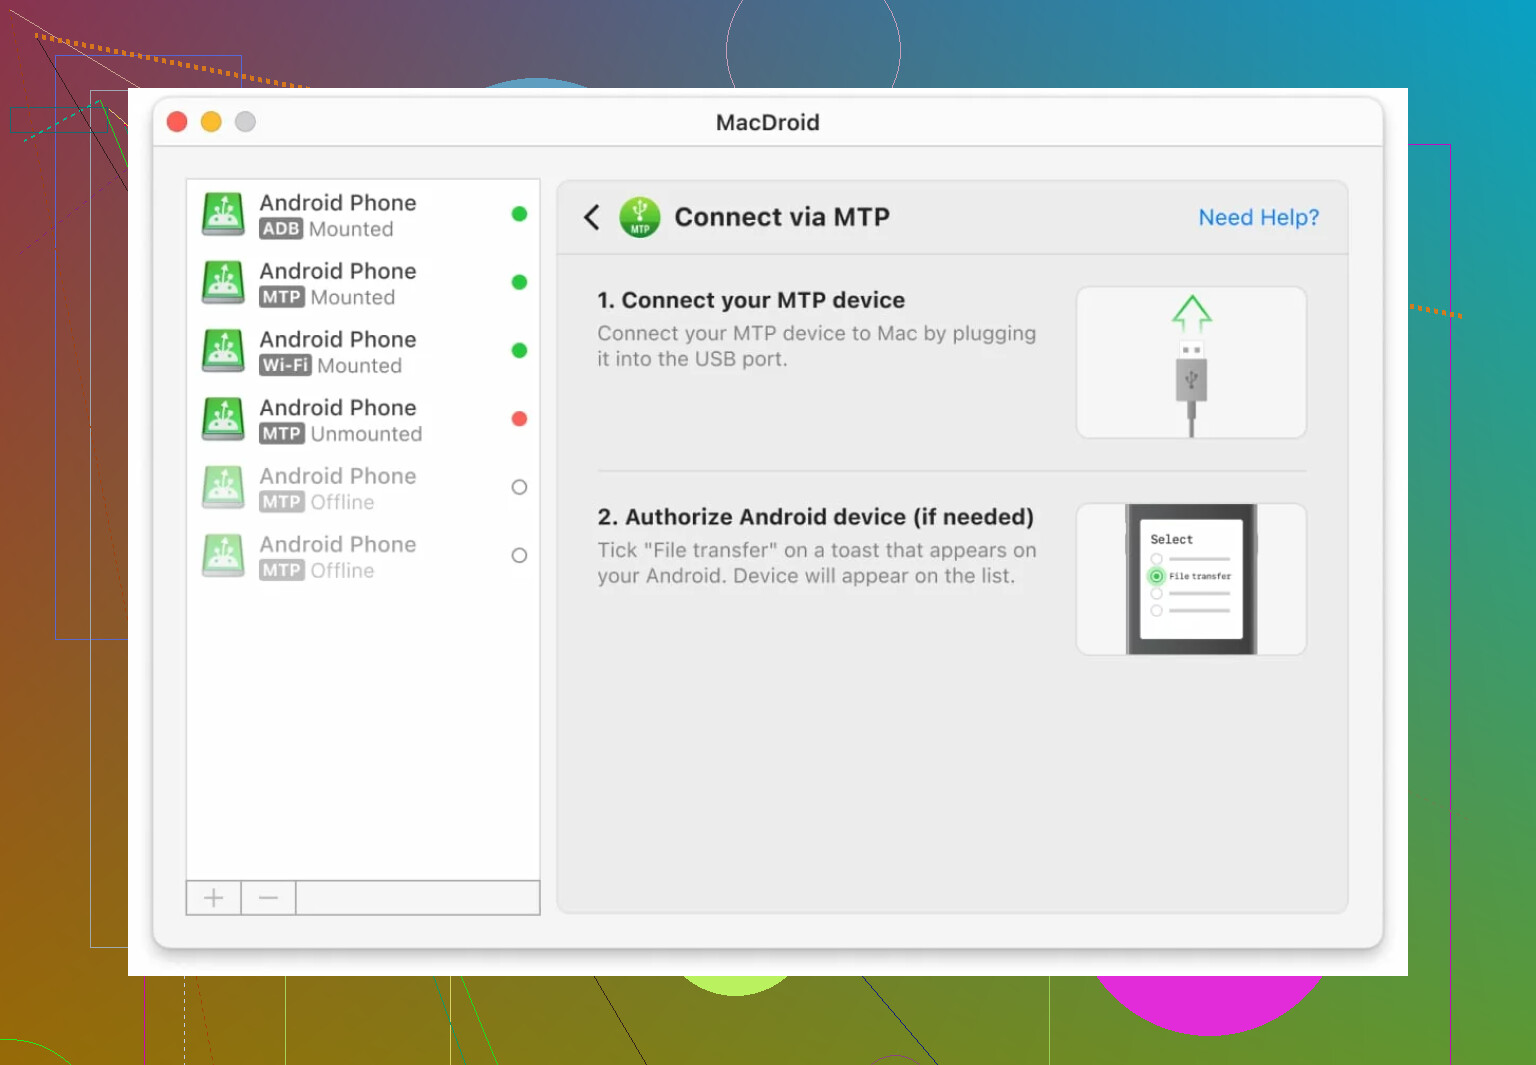
After a while I tried MacDroid, and it made the whole process feel much more natural compared to the raw Finder approach.
What I immediately liked was that browsing files felt cleaner. Instead of jumping through camera directories like a USB stick, everything felt more organized and easier to preview before copying. It just removed that “where exactly is that clip again?” feeling.
Another thing that helped is that it feels more like a proper file manager than just mounting storage. Moving files around, organizing footage, and doing multiple transfers felt less clumsy. When you shoot a lot of short clips like I tend to do, that actually saves time.
I also liked that it isn’t just for one device. If you ever connect other devices or manage different storage sources, it becomes a more general file transfer tool rather than just a one-off solution. It feels built for people who move media around often, not just occasionally.
Step-by-Step Guide for MacDroid Transfer
- Install MacDroid from the Mac App Store.
- Use a USB-C cable to connect your Osmo Pocket 3 to your Mac.
- Power on the Pocket 3. It will prompt you to select a mode; choose “Transfer Files”.
- In the MacDroid app on your Mac, select the MTP connection mode.
- The Pocket 3 will appear as a connected drive.
- Navigate to the DCIM folder to find your videos and drag-and-drop them to your Mac.
What I usually recommend now
If you only transfer files occasionally, the USB method is perfectly fine and costs nothing. Honestly, everyone should know it because it always works.
But if you use the Osmo Pocket 3 regularly, I do think using something like MacDroid just makes the workflow feel more polished and less like you’re manually emptying an SD card every time. It’s one of those small quality-of-life improvements that you don’t think about until you try it.
203 Likes
You are running into two separate issues on macOS: flaky USB and how the Pocket 3 exposes storage. I’d skip the cable first and test the card itself.
- Use a card reader instead of the camera
This is the most stable method for big 4K files.
- Power off the Osmo Pocket 3.
- Pop out the microSD card.
- Put it in a USB‑C or USB‑A card reader.
- Plug that into your Mac.
- Open Finder. The card shows up in the sidebar.
- Go to DCIM > DJI and drag your .MP4 or .MOV files to a folder on your Mac.
If transfers still fail, the issue is either:
• Bad or slow microSD card (cheap ones choke on 4K).
• Card formatted oddly.
For 4K I’d use at least:
• V30 or better.
• UHS‑I U3.
• Known brands like Samsung Pro Plus, SanDisk Extreme, Lexar Professional.
If your card is questionable:
- Back up what you can.
- Reformat in the Osmo Pocket 3 with exFAT.
- Shoot a short 4K clip and test transfer again.
- If you insist on cable, fix the flaky connection
You said the camera connects but files do not show or transfers fail. Common causes:
• Wrong USB mode on the Pocket 3
When you plug in the cable and power it on, pick File Transfer or USB OTG, not charging only.
• Bad cable
Use a data‑rated USB‑C cable. Many phone charging cables are power only.
Try a short cable directly to the Mac, no hub.
• macOS Finder quirk
If the Pocket 3 mounts then vanishes mid copy, try:
– Eject from Finder.
– Unplug, replug, power on again.
– Copy fewer files at a time, not the entire DCIM folder in one go.
- Use MacDroid if Finder is annoying
I disagree a bit with @mikeappsreviewer about Finder always being “fine”. On some setups MTP style devices feel clunky in Finder and transfers freeze more often.
MacDroid helps with that:
• You install MacDroid on your Mac.
• Connect the Pocket 3 with USB‑C.
• On the Pocket 3 pick File Transfer.
• In MacDroid choose MTP mode for the device.
• It mounts the camera storage in a more stable way so you browse DCIM, preview clips, and move them without Finder freaking out.
I still prefer a card reader for long shoots, but if you connect cameras and Android devices often, MacDroid is a solid workflow tool and quicker than hunting through random folders every time.
- Check file format and codecs
If the files transfer but do not open cleanly:
• 4K at high bitrate stresses slow drives. Copy to an internal SSD first if you edit in Final Cut or Premiere.
• If you shot in H.265, older Macs struggle. You might need to transcode to ProRes or H.264 with something like HandBrake before editing.
- Quick troubleshooting checklist
• Test with a good USB‑C cable direct to the Mac.
• Test with a dedicated card reader.
• Replace the microSD card if it is non‑V30 or generic.
• Reformat the card in the Osmo Pocket 3 using exFAT.
• Try MacDroid if Finder sees the device but behaves weird.
Do those in order. The one that fixes 90 percent of these issues is “use a proper card reader and a decent SD card,” even if it feels a bit old‑school.
Couple of extra angles that might help, on top of what @mikeappsreviewer and @yozora already said.
First, I’d stop fighting the “camera as a drive” thing and test whether the problem is actually your Mac, the cable, or the card:
-
Rule out your Mac / USB port
- Plug any known good USB drive or SSD into the same port.
- Copy a 10–20 GB file.
- If that fails or crawls, your Mac or hub is part of the problem, not the Pocket 3.
-
Check how the Pocket 3 is formatted & recording
- In the Pocket 3 menu, check:
- File system: exFAT is what you want for big 4K clips.
- Bitrate / codec: very high bitrate H.265 can be rough on slow cards.
- If you used a cheap card, you might actually have corrupted files, not just transfer issues.
- In the Pocket 3 menu, check:
-
Try “import-style” instead of drag & drop
Finder drag & drop is the most fragile way to move big 4K batches, in my experience. Instead, try:-
Photos app
- Open Photos on the Mac.
- Connect the Pocket 3 (USB, set it to file transfer).
- Check the “Import” tab in Photos.
- If your clips show up, import them that way. Photos is surprisingly more stable for some cameras because it handles MTP quirks a bit better.
-
Final Cut Pro / Premiere / DaVinci Resolve
- Open your editor.
- Use its media import tool.
- Point it directly at the Pocket 3 or the card.
NLEs often handle flaky devices more gracefully than Finder.
-
-
I slightly disagree about “card reader fixes everything”
Card readers are great, but if your Mac is choking, you just moved the bottleneck. A good reader plus a good card is key:- USB 3.0 or 3.1 reader, not a 10‑year‑old one from a printer.
- Plug directly into the Mac, not into a random keyboard or daisy chained hub.
- Once it mounts, use something like:
File > New Folderon a fast internal drive (not a slow spinning external).- Copy 5–10 clips at a time instead of the entire DCIM folder. This avoids one bad file killing the whole transfer.
-
Where MacDroid actually helps vs Finder
I don’t totally buy that Finder is “good enough” for everyone. When devices expose storage in MTP-ish ways, Finder can feel half-baked.MacDroid actually makes sense in a couple of specific situations:
- You want the camera to show up in Finder like a “real” drive and stay stable during long transfers.
- You move stuff between Android devices and cameras a lot and are sick of hunting through odd DCIM folder structures every time.
- You want previews and more control instead of pure drag and pray.
In that case:
- Install MacDroid on the Mac.
- Connect Pocket 3 by USB‑C, choose file transfer on the camera.
- In MacDroid pick MTP mode, then just browse to DCIM / DJI and copy.
It sidesteps a bunch of the Finder weirdness and makes “camera as external storage” feel less fragile.
-
Sanity checks so you don’t chase ghosts
Before you dive into more apps or new hardware, do these quick checks:- Try a different short USB‑C cable that you know passes data (like from an SSD, not a charger brick).
- Test with a single short 4K clip instead of a whole day’s worth.
- Copy to your internal SSD first, then move to any external drives.
If a good cable + direct port + small copy still fails, I’d suspect:
- The card is borderline for 4K.
- Some clips are corrupt from the start.
- Or the Mac’s USB stack is being flakey, in which case MacDroid or a solid card reader is usually the cleanest workaround.
Use DJI Mimo and AirDrop. This avoids cables, card readers, Finder, and extra Mac software.
Connect your iPhone or iPad to the Pocket 3 through DJI Mimo. Open Album, select your clips, choose original quality, and download them. Then select the videos in Photos or Files and AirDrop them to your Mac.
This works well for a few important 4K clips. Keep both devices nearby and plugged in, since large files take awhile and drain battery alot.