My SD card was working fine in my camera and laptop, but now it suddenly says it needs to be formatted before I can use it. I have important photos and files on it that I really don’t want to lose. What could have caused this, and is there any way to fix the SD card or recover the data without formatting it?
Been in that hole before with an SD card freaking out in Windows.
If Windows pops up and tells you it needs to format the card, hit cancel. Do not let it format. When I had this happen, the data was still there, the file system header was trashed so the OS treated it like a blank card.
Here is what worked best for me, step by step.
- Put the card back in the camera, not in a USB card reader.
- Plug the camera into the computer with a USB cable and access it that way.
- On my side, the camera handled the card better than Windows did, and sometimes it would show the files even when the PC thought the card was dead.
If the camera does not see the files, I went the software route.
I used Disk Drill on a PC and ran a full deep scan on the SD card. It took a while, but it pulled back most of my photos. I followed a guide similar to this discussion that breaks down photo recovery steps pretty clearly:
https://discussion.7datarecovery.com/forum/topic/how-can-i-recover-photos-from-a-formatted-sd-card/
Key rule that I ignored the first time and paid for it:
Do not save, move, delete, or create anything on that SD card before you scan it. No new pictures, no file moves, nothing. Every new write risks landing on top of the old data you want back.
Once I got my stuff recovered, I stopped trusting the card. It had already started to fail, so I tossed it and bought a new one. Still managed to recover about three months of photos, so for me it was worth the effort.
296 Likes
SD cards start asking to be formatted when the file system gets corrupted or the card starts failing. The data is often still there, the directory info is what is messed up.
Common causes:
- Yanking the card out during write.
- Low battery shutdown during shooting or transfer.
- Cheap or fake SD card.
- Wear from a lot of writes.
- Bad reader or dirty contacts.
You got good steps from @mikeappsreviewer. I would not rely on the camera method alone though. Sometimes the camera hides errors and you do not see the full picture.
Here is what I would do, without repeating the same flow:
-
Stop all writes immediately
Do not format.
Do not run chkdsk or Disk Utility repair.
Do not copy files to the card.
Only read from it. -
Try another reader and another device
Use a different SD reader on another PC or laptop.
Test in a second camera if you have one.
If one device reads it fine, pull your data at once. -
Make a full image of the SD card
This step saves you if the card is dying.
On Windows, use something like HDD Raw Copy or similar tools to clone the whole card to an image file.
Work on the image, not on the card.
That reduces stress on the failing card. -
Use data recovery software
Since you care about photos, recovery software helps a lot.
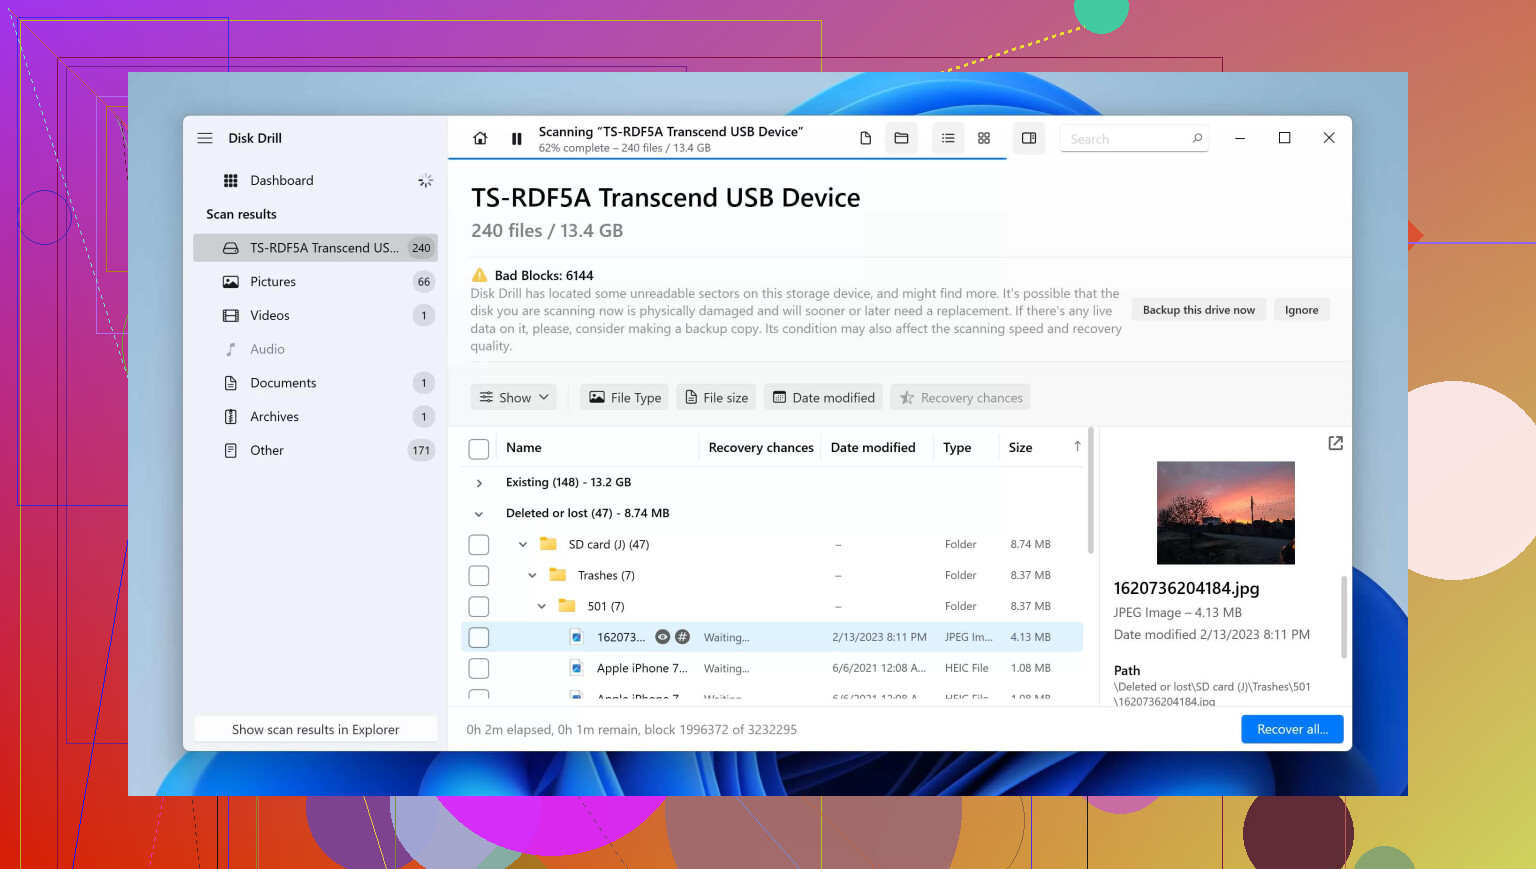
Disk Drill is a solid option for photo recovery and file system scan.
Install it on your PC, point it at the SD card or the image file, run a deep scan, and recover to a different drive.
Do not recover files back to the same SD card. -
Check if the card is fake or worn out
Run a tool like H2testw or F3 on the card later to test capacity and health.
Fake cards report 128 GB but have 8 or 16 GB inside, which corrupts data once you pass the real size.
If you see slow speeds, write errors, or capacity issues, retire the card. -
Replace the card once you get your files
Even if you recover everything, do not trust this SD card again for anything important.
Use a new, branded card from a reliable store.
About your original question, the most likely causes in your case:
- The file system header got corrupted after a bad removal or power loss.
- The card is starting to fail from age or heavy use.
- If it was a cheap no‑name deal, it might be fake capacity.
If you want a quick walkthrough, this video on fixing unreadable SD cards and recovering files is useful:
Step by step guide to fix and recover data from a corrupted SD card
Short version of how to handle an SD card that asks to be formatted:
- Do not format.
- Do not write to it.
- Try another reader or device.
- Clone the card if possible.
- Use recovery software like Disk Drill.
- Replace the card once done.

Windows yelling “this card needs to be formatted” usually means:
your photos are still on the card, but the file system info that tells the OS where they are is messed up. The camera and computer were happy before; now the directory / header area is corrupted, or the card itself is starting to die.
@mikeappsreviewer is spot on about not letting Windows format and trying the camera directly. I’ll slightly disagree on relying too much on the camera though: some cameras will pretend everything is fine until they suddenly force you to format too, so don’t treat that as a long‑term fix. It’s just one more way to read the card once, grab what you can, then retire it.
@himmelsjager already covered the smart stuff like imaging the card and not running chkdsk or Disk Utility “repairs” first. I’d emphasize that: file system repair tools can actually overwrite “orphaned” data and make later photo recovery harder. They’re for disks you don’t care about, not for the one holding your memories.
What most likely happened in your case, in plain terms:
- The card’s file system header got corrupted
- Card pulled while camera or PC was still writing
- Camera battery died mid‑shot or mid‑transfer
- Laptop went to sleep or crashed during copy
- The SD card is cheap / fake or just worn out
- A lot of low‑cost cards are “128 GB” but really 16–32 GB inside
- Once you cross the real capacity, old data gets silently overwritten
- Worn‑out flash cells start flipping bits and the file system falls apart
- Reader or contacts acted up
- Dirty / bent contacts or a flaky USB reader can randomly corrupt writes
Once that file system map is damaged, the OS panics and says “I don’t understand this disk, wanna format it?” Formatting would build a brand new empty file system on top of the old data, which is exactly what you don’t want before running recovery.
Since you already got great step‑by‑steps from those two, here’s how I’d complement their advice without repeating:
-
Treat the card as “read only” from now on
Think of the card as a crime scene. Any write is like stomping through the evidence.- No in‑camera formatting “to fix it”
- No quick format in Windows or macOS
- No “repair disk” tools yet
-
If it still mounts anywhere, copy manually first
- If any device shows some folders, grab those files immediately to a hard drive or SSD
- Don’t try to “organize” or rename or delete stuff on the card during this; just copy
- Even partial copies reduce what you need to recover later
-
Skip random “magic fix” tools you find on YouTube / download sites
A lot of one‑click “fix SD card errors” utilities:- Actually run the equivalent of chkdsk and rewrite the file system
- Install junk or are outright malware
For recovery, you want tools that read raw data and reconstruct files, not tools that “fix” the partition for general use.
-
Use pro‑grade recovery software on the card or its image
This is where something like Disk Drill makes sense. It’s built to:- Scan at a low level and ignore the broken file system
- Recognize common photo formats (JPEG, RAW, MOV, MP4 etc.) by signatures
- Let you preview found photos before saving them
Just be sure of two things: - Install Disk Drill on your computer, not on the SD card
- Recover files to a different drive, never back onto the SD card
-
After recovery, permanently retire the card
On this I 100% agree with both @mikeappsreviewer and @himmelsjager: once a card shows this behavior, it is no longer “unlucky,” it’s unreliable.- Don’t trust it again for irreplaceable photos
- If you’re curious, you can test it later with something like H2testw / F3 to see if it is fake or failing
- But treat that as science experiment only, not “is it safe for my next vacation shots?”
If you’re wondering why SD cards are so fragile in these situations, it’s because of how they store and track data internally. Flash memory has limited write cycles and relies on tiny cells of charge that wear out and flip bits over time. The file system on top of that (FAT32, exFAT) is simple and fast, but not very robust: a single bad write to the allocation table can make a healthy pile of photos look like an empty, “unformatted” volume.
If you want a clear, human‑readable breakdown of how these cards actually function, capacity tricks, and why formatting messages pop up, here’s a solid explainer:
how SD cards store your data and why they sometimes fail.
It covers what SD cards are, how they manage flash cells and file systems, and what that means for performance, lifespan, and data safety.
Short version:
- That “needs to be formatted” popup usually means file system corruption, not instant total loss
- Do not format and do not write to the card
- Try to read it from any device that will mount it and copy what you can
- Use data recovery software like Disk Drill for a deeper scan
- Assume the card’s life as a trusted storage device is over once you’re done recovering.
Short version: the “needs to be formatted” message is your operating system giving up on the file system, not necessarily on the data. Your photos are probably still there in raw form; what is broken is the “map” that points to them.
To avoid repeating what @himmelsjager, @suenodelbosque and @mikeappsreviewer already walked through, I’ll focus on a few extra points and a bit of “what not to do next time” once you (hopefully) get the images back.
1. Why this actually happens (under the hood)
They all touched on causes; here is the technical angle:
-
Most camera cards use FAT32 / exFAT, which keeps a tiny, critical area with:
- Partition info
- Allocation tables
- Root directory records
-
If that area takes a hit (power cut, bad block, flaky controller), the OS cannot make sense of anything and assumes:
“This looks like an empty card, please format.”
-
Meanwhile:
- The bulk of the data blocks still hold your JPEG / RAW files intact.
- Only the index is mangled.
That is why “repair” tools can be risky: they try to rewrite the index, sometimes over space that still contains your photos.
Here I slightly disagree with people who say “run OS repair after you image the card.” If you care mostly about photos, I would first do signature-based recovery from a raw image and only later try to repair the file system as an experiment.
2. When your OS disagrees with the camera
Occasionally the camera reads the card “fine” while Windows or macOS screams for a format. This can mean:
- The camera firmware is more tolerant about minor FAT/exFAT inconsistencies.
- The PC is stricter and bails as soon as something looks off.
So:
- If the camera still shows thumbnails or lets you browse: copy from the camera as fast as possible.
- If the camera also demands a format, then the corruption is in the shared logical area the camera needs too, or the card hardware is flaking out.
I would not treat “it works in the camera again” as success. It can appear fine for one more shoot and then total out. Use that window only to extract data, then retire the card.
3. Disk Drill: when it makes sense and what to expect
Since you asked about getting the photos back, a proper recovery tool really is your best bet. Disk Drill has already been mentioned, but to add something useful:
Pros of Disk Drill
- Very good at photo-specific recovery:
- Recognizes JPEG, RAW formats from most camera brands, video formats, etc.
- Can reconstruct files by signatures even when the file system entries are gone.
- Simple enough UI for non-experts while still having:
- Deep scan
- Partition scan
- Work on disk images instead of the live card.
- Lets you preview found files before you commit to recovering them, which is a big sanity saver.
Cons of Disk Drill
- Deep scans can be slow, especially on large SD cards or if the card is physically marginal. Plan for hours, not minutes.
- Free edition has limits on how much you can recover before you need a license, which might be annoying if you have a huge shoot.
- It can produce a ton of “fragmented” or nameless files:
- File names and folder structure are often lost.
- You may get many “recovered_jpeg_001.jpg” style files and need to manually sort.
Used correctly, Disk Drill is still one of the more balanced tools between “not a total nightmare to operate” and “actually good at photo recovery.”
Competitors that people in this thread already nodded to indirectly:
- The approach @himmelsjager suggested, especially imaging the card and working on the copy, is very much in the “forensic” direction and is what you want if the card is dying.
- The camera centric method @mikeappsreviewer described can sometimes bypass OS quirks, although I would not stop there.
- @suenodelbosque highlighted the real-world bit flip problems and fake capacity angle, which are often underappreciated causes.
None of those contradict using Disk Drill; they complement it. The real power move is:
- image the card, 2) run Disk Drill (or similar) on the image, not the card.
4. Subtle things that actually cause the corruption
The obvious stuff (pulling the card while writing, battery dying) was covered. Here are a few less obvious triggers:
-
Background indexing or antivirus on the computer touching the card while you copy.
- If the card or reader is marginal and gets hammered by extra reads/writes, a single bad write is all it takes to poison the file system.
-
Switching between multiple devices that format differently:
- Camera A formats as one cluster size and allocates its own folders.
- You format in Windows, then the camera reuses it, then you stick it into a game console or another gadget.
- Many small inconsistencies slowly accumulate until one day the OS refuses the card.
-
Fake “high capacity” cards:
- They keep “overwriting” the same physical area once you pass the real size.
- What looks like “sudden” failure is actually the moment your data crosses the hidden boundary.
If your card was a suspicious bargain or off-brand, I would almost bet on that last one.
5. After you recover: how to avoid this mess again
Once the dust settles and you have what you can:
-
Retire the card for anything important. Use it at most for scratch tasks where nothing matters.
-
Buy known brand, reputable source, not just “whatever is cheapest from a random marketplace listing.”
-
Always format in the camera that will use the card, not on the PC, unless there is a specific reason.
-
When offloading:
- Copy to your computer.
- Verify a few random photos open correctly.
- Then format again in the camera rather than deleting files on the card.
-
Avoid long-term archiving on SD cards. They are transport and capture media, not backup.
So in practical terms:
- The error almost certainly means a corrupted file system or failing SD controller, not that your photos have instantly vanished.
- Let the card be read-only from now on.
- Follow the imaging + recovery route like @himmelsjager suggests, use the camera trick from @mikeappsreviewer as a one-time extraction attempt, and bring in Disk Drill (or an equivalent) to dig out as many photos as possible.
- When you are done, let that card retire gracefully instead of trusting it with another once-in-a-lifetime trip.
Try this simpler route. Slide the SD adapter lock to ON to keep it read only. Put the bad card in your camera. Insert a new, known good card in the second slot. Format only the new card in camera. Open the Playback menu, choose Copy images or Transfer. Select All. Start the copy. Many bodies read files even when Windows says format. If your camera lacks two slots, take the locked card to a photo lab kiosk. Copy to a USB stick there. Kiosks often read quirky cards. Get your photos, then retire teh old card. Dont reuse it.